
Technical Tip
The default settings on this screen are set on the Default Settings for New Customers screen – see "Edit - Applications - POS - Default Debtor".
Use this procedure to create a sales docket for a non-account customer when goods sold are to be delivered by the store, picked up by a customer at a later date or the customer has placed a special order.
|
|
|
Technical Tip The default settings on this screen are set on the Default Settings for New Customers screen – see "Edit - Applications - POS - Default Debtor". |
To set up a new customer record:
Micronet displays the Enter Transaction screen.
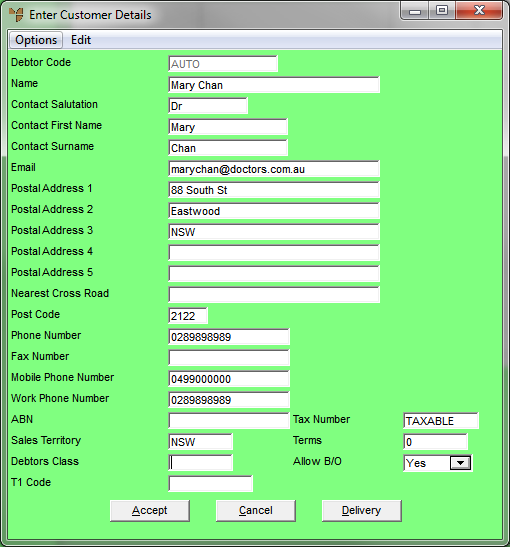
Micronet displays the Enter Customer Details screen.
|
|
Field |
Value |
|---|---|---|
|
|
Debtor Code |
If your Micronet system is set to auto customer numbers, Micronet automatically allocates the next available debtor number. If not, you need to create the debtor number using the same format each time. For example, your management may have chosen to use the first three letters of the surname or business name, followed by a number sequence, etc. |
|
|
Name |
If the customer is a person, enter the customer's first name followed by their last name. If the customer is a company, enter the company name. You must enter a name. |
|
|
Contact Salutation |
If the customer is a person, enter the salutation, e.g. Mr, Mrs, Ms, etc. |
|
|
Contact First Name |
Micronet displays the first name entered in the Name field. You can change this if required. |
|
|
Contact Surname |
Micronet displays the last name entered in the Name field. You can change this if required. |
|
|
|
Enter the debtor's email address. |
|
|
Post Address 1, 2, 3, 4, 5 |
Enter up to five lines of postal address details for the customer, e.g. unit number, street address, suburb and state. |
|
|
Nearest Cross Road |
Enter the nearest cross road for the debtor’s address. |
|
|
Post Code |
Enter the customer's postcode. This enables postcode sales reporting or searching by postcodes. |
|
|
Phone Number |
Enter the customer's phone number. You must enter at least one phone number for a debtor. If you only know the customer's mobile number or work number, enter it in this field. |
|
|
Fax Number |
Enter the customer's fax number. |
|
|
Mobile Phone Number |
Enter the customer's mobile phone number. |
|
|
Work Phone Number |
Enter the customer's work phone number. |
|
|
ABN |
Enter the customer's Australian Business Number. |
|
|
Sales Territory |
Enter the customer's default sales territory if required, or press Tab or Enter to select a sales territory. This allows grouping of customers into sales territories or regions for reporting and analysis. |
|
|
Debtors Class |
Enter the default class for this debtor. You can also press spacebar then Enter to select a class. This field gives you an alternative means of grouping customers for reporting/inquiries. |
|
|
T1 Code |
If you are using T accounts within the Micronet General Ledger, enter the default T1 account for this customer. You can also press spacebar then Enter to select an account. |
|
|
Tax Number |
Micronet displays TAXABLE in this field. This applies to all customers liable to pay GST or sales tax. The following exceptions apply:
Any entry in the tax number field other than TAXABLE is treated as GST exempt. |
|
|
Terms |
Enter the number of days by which invoices must be paid. |
|
|
Allow B/O |
Select Yes if backorders are allowed for this customer, or No if they are not. |
|
|

|
Best Practice It is important to enter as much of the above information as you can, since this information prints on the customer's order confirmation, the supplier's purchase order for delivery instructions to the customer, and other documents. |
Micronet creates a new debtor account in the Debtor master file and redisplays the Enter Transaction screen.
Refer to "Creating a New Docket, Layby or Quote".